Crocodile-Shaped Melon Bread in the Microwave.
 You can have Crocodile-Shaped Melon Bread in the Microwave using 13 ingredients and 18 steps. Here is how you achieve it.
Ingredients of Crocodile-Shaped Melon Bread in the Microwave
- You need of Bread (strong) flour.
- Prepare of Cake flour.
- You need of Milk.
- Prepare of Salted butter.
- You need of Sugar.
- It's of Dry yeast.
- It's of Salt.
- It's of + 1 teaspoon Matcha + hot water.
- It's of *Cake flour.
- It's of *Butter (unsalted).
- It's of *Egg yolk.
- Prepare of *Sugar.
- It's of *Matcha.
Crocodile-Shaped Melon Bread in the Microwave step by step
- Make the cookie dough from the ingredients marked *. Cream the butter and mix with the sugar until smooth. Then add the egg yolks, mix, sift in the flour and matcha and fold in with a spatula until it's no longer floury. Split the dough into 6, wrap with plastic wrap and leave to rest in the refrigerator..
- Making the bread dough. Add the butter and milk to a heat-resistant bowl and warm to body temperature in the microwave. Mix until the butter has melted, add in the yeast and sugar and mix once more..
- Add 1/3 of the flour and mix with a whisk until it's no longer floury. Then add the remaining 2/3 of the flour and fold in with a spatula..
- Add the matcha and blend in for 1 minute. Once the colour starts to change a little, it should be enough, so wrap the dough and warm for 30 seconds in a 200 W microwave. Turn out onto a dusted surface and knead the dough until the colour becomes even and it stops sticking to your hands. You may need to re-dust the surface..
- To keep the surface of the dough nice and even, form the dough into a ball by folding the dough under itself. Wrap with plastic wrap and leave to rest for 15 minutes under a damp cloth. Once the dough has expanded to 1.5 times the original size, deflate the dough and it's ready for shaping..
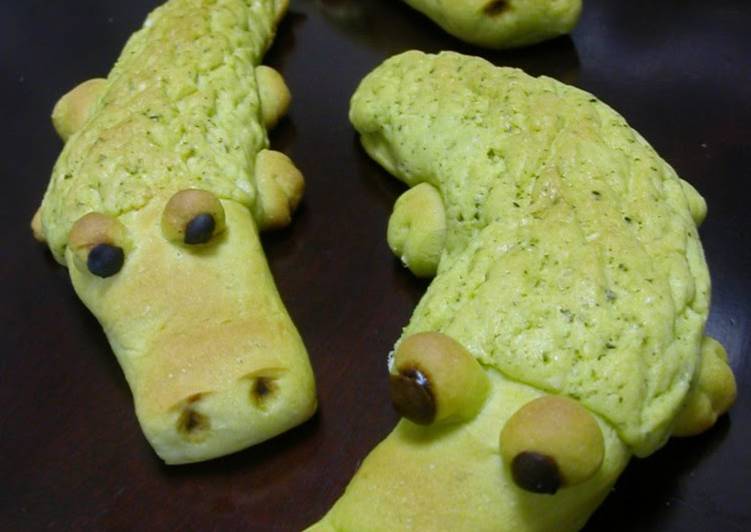
- Split the dough into 7 pieces. Take 1 of the 7 pieces and use it to make the eyes and feet. From this piece use 1/4 of the dough for eyes so split into 12 pieces. Split the rest of the 3/4 into 24 pieces for the feet. Keep these pieces under a damp cloth. Take the 6 big pieces of dough and roll each one out to a size of 2.5 x 17 cm. You should be able to make 6 crocodiles with 1 body, 2 eyes and 4 feet each as in the photo..
- Let's make the crocodile's body. To create the tail, form the dough gradually into a point and create the snout by pressing the dough at the front down with your finger..
- Poke some holes in the end of the snout with a toothpick to create the nostrils. Add some cocoa mixed in water into the nostrils to give shadow and a more relaistic looking croc when it's done..
- Roll out the cookie dough to a 5 x 12 cm rectangle. To avoid dealing with the stickiness try rolling it out between 2 sheets of cling film..
- Rest this cookie dough on top of the body you made in step 8. Once you've wrapped the cookie dough over the edges, start working on top of a sheet of parchment paper. This is because when you start putting things together it will become had to move..
- With a toothpick, carve some triangle patterns on to the crocodiles back. It's an annoying but necessary step if you want your crocodile to look real..
- Make the dough for the eyes into balls and flatten one edge of the feet down to make them easier to attach to the body. Carve some claws into the feet and attach everything together by pressing with your fingertips. If you have egg whites left over from the cookie dough you can use this as a type of glue to fix everything together better..
- And now you've got a full body! Try bending the tail to one side for a sense of motion. Because it takes so long to form 1 body, keep the rest of the dough covered with a damp cloth while you are working..
- Once the tail is bent, get it on the baking tray. Wrap with cling film and pop in the microwave for 30 seconds at 200w. Leave to rise for 20 minutes and then bake in an oven preheated to 200°C for 30 minutes..
- Once baked, leave to cool and apply finishing touches such as chocolate eyes to finish. I burned these a little and their faces went a bit brown. Their nostrils stand out thanks to the cocoa mixture..
- December 2008 - tried making the bread dough in a bread maker. It came out plumper than making it in the microwave..
- When using a bread maker, reduce the amount of yeast to 3 g. You could add more matcha or green tea without affecting the taste..
- If the dough is browning too much try covering it with foil while it's baking. If you are using a gas oven with a strong flame please adjust the cooking time appropriately..